Hey everybody, there is a page now for you to check out what our house looks like. I am hoping to add some more current pictures in a week or two. So go ahead, snoop around.
(Oh and if you want to check out how my 365 Project is going click here)
Home Tour Page Added!!
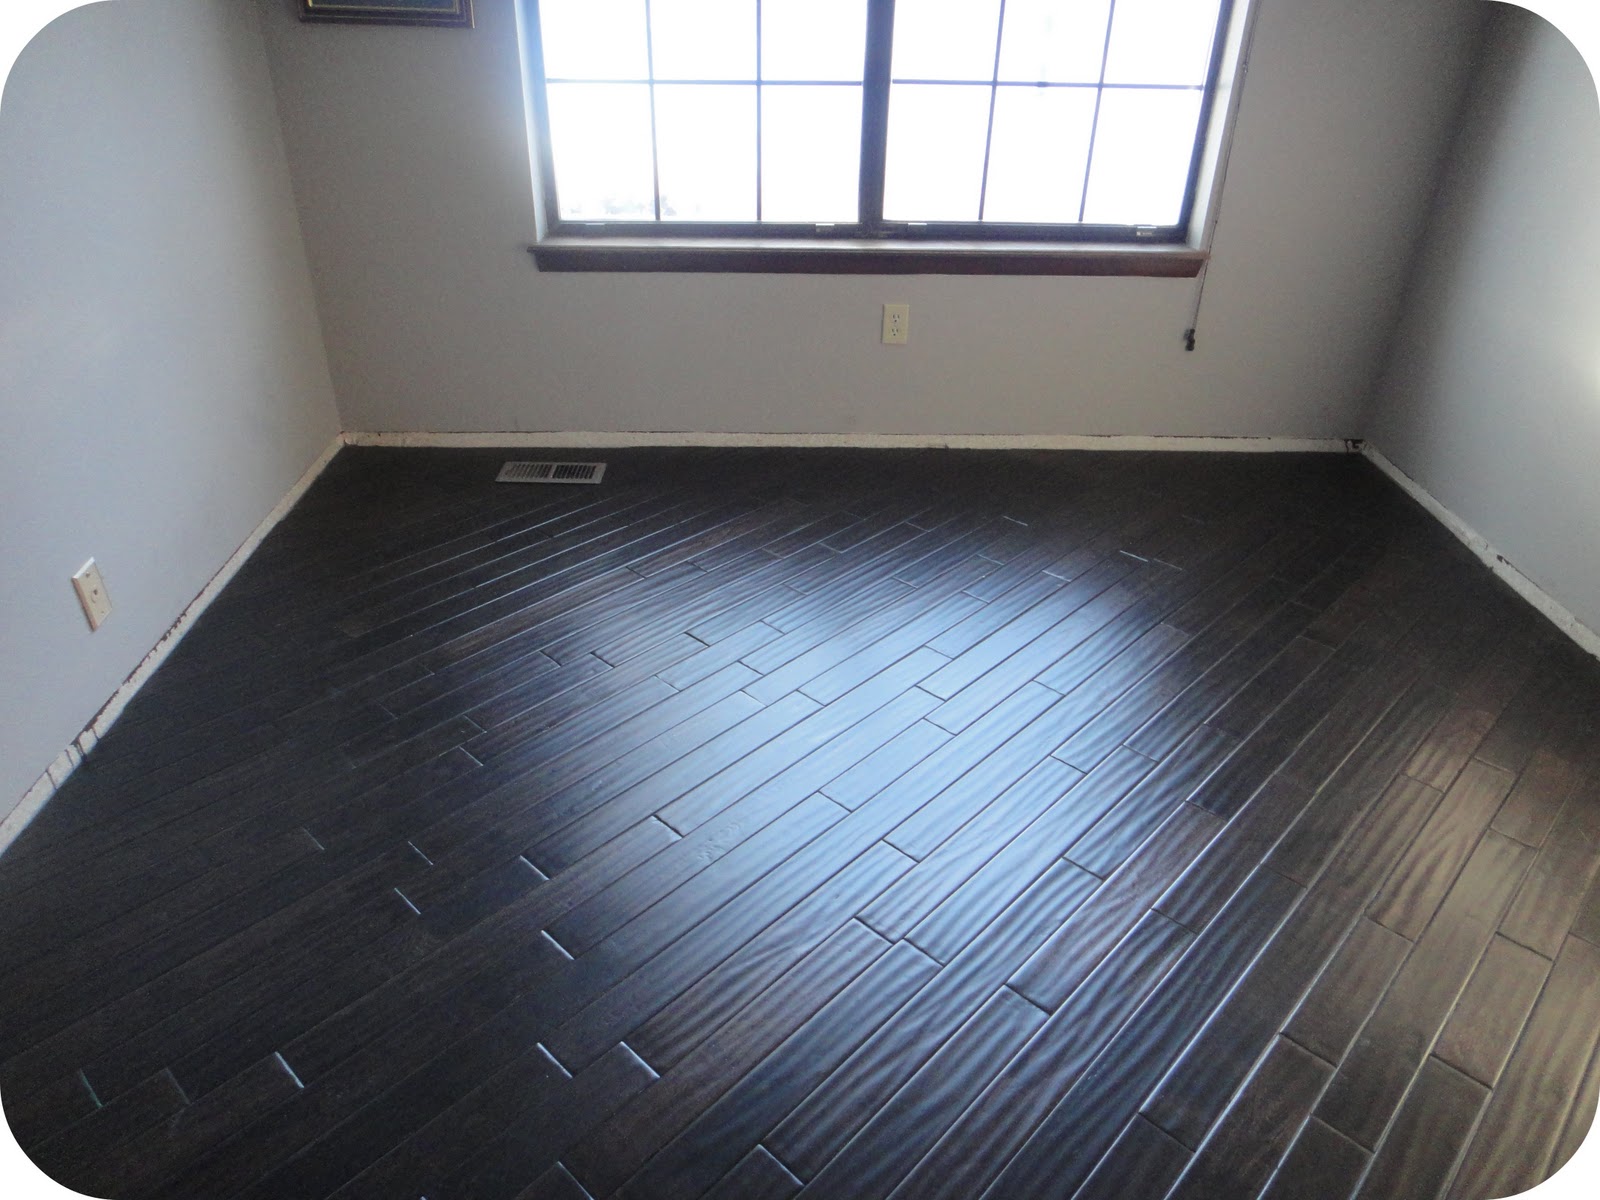
Diagonal Hardwood Flooring Part II
Well I have finally finished the flooring in our downstairs bedroom. It looks beautiful! (I would say that even if I didn’t do it my self) And now I am back to finish pointing out the difficulties of laying hardwood flooring on a 45º.

First up, a floor outlet. We live in a townhouse that has no outlets in the shared walls. Strange but whatever. We had to drill holes around them in our living room and the second bedroom. We bought a circle saw thing from home depot that is just a little bigger than the housing for the outlet and taped the 2 boards together with painters tape that would surround the outlet and drilled/cut the holes. Easy Peasy. But this time it was a little more difficult to measure the location of the outlet with the angle thrown in the mix. So to begin, I cut my 45º on both boards to go up next to the wall, and tapped them together. And I also started marking out where the outlet would be. (this is so hard to explain and put into words)

Now I needed to measure the distance from the wall to the far side of the outlet. I used the same t ruler thing and a speed square. The distance is 44cm. (I don’t usually use the metric system, only when that is the side of the ruler I need at the time) Turn the ruler around and mark 44cm on the tape. Now repeat for the other sides and that will give me a square!


So to make my circle I take the saw part off the drill part and use it to trace where my circle will be. Put that all back together and go outside to drill the hole.


Once that is done you just install the boards as normal. See!

On to the next thing, filling in the corner where I started. I needed to get a spline or slip tongue for this. Home Depot does not carry this item. You will need to contact a hard wood floor place. I got my wood flooring at Lumber Liquidators and they were out, however they did refer me to MacDonald Hardwoods in Denver as another option. (That is something I really love about Lumber Liquidators, they will suggest other places to get supplies that might save you money even if they sell the item themselves.) So I drove on down to old MacDonald’s to pick up this small piece of wood that I absolutely needed and guess what, they gave it to me for FREE. I really only needed 2 1/2′ of it and would have cost less than $5 but hey, I don’t mind free. So here it is, kinda self explanatory once you see it, but essentially a slip tongue is used to reverse the direction of hardwood flooring by allowing you to put 2 grooved ends together securely. Take a look see.


And while cutting the last tiny pieces I just used the previous board to finish off a triangle instead of trying to measure that tiny part. Oops, well it will be mostly covered by molding anyway so I don’t really care, but for future corners, just glue that piece in.


Alright, getting around the little wall that stuck out to define the closet was a little awkward. So again, I got my board cut to go up against the wall like before with the outlet, and leaned it against the corner I needed to cut around. Using my speed square again, I marked the point of the corner, measured the distance I needed to leave and made a 90º angle there to cut out with a jigsaw. Worked perfectly.


On the other side I did the reverse and cut out the corner with the same jigsaw will less than desirable results, but again it will be covered with molding.


Now I just need to get some base boards to finish off this project. What do you think? Would you ever try to install hardwood flooring on a 45º angle?

New Years Resolutions
I hope everyone enjoyed their holiday season. I cannot function properly during the whole month of December. Last night was the first time back to the gym in who knows how long, the laundry is respectably caught up, our kitchen is clean, and I am on my way to start out the year on a good foot. So here are my resolutions.
1. Write at least 1 blog post a week. Hopefully they won’t be as lame as this one. I would really like to work on enough projects this year to have some substance that is worth writing and reading.
2. Work on one room at a time. While I feel I can justify our sporadic work flow with the fact that there was so much to do and so much nasty carpet to rip out. But now we are at a good point to finish rooms before we move on. We haven’t decided which should be first but I think the kitchen will probably be the lucky one.

On the list for the kitchen is a kitchen table with a butcher block top and stools to accompany (I like this table and stools from Ana White), fill in the hole above the microwave (with this), get the matching dishwasher to complete our kitchen appliance set, and touch up paint. I’m sure we could think of other things, like new lighting and maybe a pot rack above the future table.
3. 365 Project. I read about this in the Photojojo book, you take a picture a day for a whole year. I am on track for now. Let’s just hope I don’t screw it up by missing a day. So much pressure.


4. Keep a tidy house. If we can do something for 20 minutes a day every day hopefully our home will always be clean. We are by no means filthy, but I don’t like putting things away so by the weekend our coffee table is overflowing with stuff. And I detest putting the laundry away. So to achieve this I’m thinking of creating a 2 week routine to put our cleaning on auto pilot.
Welp that is it for now. Fingers crossed that I succeed and don’t melt down next December.
Diagonal Hardwood Flooring
It’s been a while since Matt and I have worked on some hardwood flooring. We purchased 44 boxes of hardwood flooring when we purchased our home last July. We put hardwood flooring in the living room, dining room, Matt’s son’s bedroom, and our bedroom. After all that we still have 9 boxes left. Originally we were planning to do the kitchen as well but decided to tile that room instead. What to do with the left over? Well, do another room. We have a small bedroom thats off the living room right by the front door. And since it’s right off the living room we decided to change the direction of the wood so we don’t have to worry about everything being straight. Anyway, here’s the progress so far. (With some tips that I’ve figured out.)
I measured out from my starting corner 2 feet in each direction and snapped a chalk line. Measure the line, subtract a 1/2 inch. Take your first board and cut your first 45º cut so that the groove side is shorter. Measure from the point on the tongue side and mark your opposing 45º cut. This should line up with the chalk like with 1/4 inch gap on each side. Blind nail into place with a nail gun. Once you have worked away from the wall a little you can use a floor nailer, but the very edges will always need to be nail with a nail gun.

I also had a heat vent to work around almost right away. I measured and marked the wood with a square, then used a jig saw, and miter saw to make the cuts.

Work your way out into the room. I found that if you make 3 separate beginning pieces with 45º angle cuts and work your way to the other end, but leave the last piece open, you can work with 3 rows at a time, you will be switching your miter angle less ofter and saving yourself time.

Once I worked myself across to the first corner, I cut a beginning piece. I figured it would be easier to start then try to figure the measurements for 2 separate 45º angles. But it still was not as easy as 2 equal cuts. I only had a small amount along the first wall to cover but more on the new wall that I was going to be working on. I decided to make the longer cut first and then just guess on the next cut. It took a few extra trips to the miter saw but I only used the one piece of wood and it turned out perfect. Then just blind nail the board into place with the nail gun. The floor nailer will not work even further from the wall now since the angle has changed.


Here is an easy way to measure the last piece to fill into the space between the wall and the last whole board. First mark with a pencil the direction of the 45º angle for reference. I get confused a lot and this saves me from making the wrong cut. Then flip the board around so that the tongue is touching the tongue on the last whole board. Make sure the boards are parallel and the other end is butting up against the wall.


Take a speed square and lay it on the board so that the 45º angle is going in the same direction as your reference mark and line it up with the corner of the whole board. Then move it towards the wall 1/4 inch. Mark the angle with a pencil and there is your cut line. I have had a few cuts that I’ve had to cut just a little bit more but, it a lot better than cutting off too much.


I hope these tips that I have figured out so far are helpful. If I discover any other tips while finishing the second half of the room I will be sure to share them. And of course I will post some after pictures when I am all finished. Hopefully in a week or two (just in time for x-mas). Happy Monday!
~Nikki
How to: Feather Hair Extensions

It seems the current fly by night trend is those feather hair extensions. They look pretty cool, I like the, but I’m sure they will be gone as quickly as the hair shimmers of last year. Anyway, I wanted to give it a shot to see if I could figure them out. I am a hairdresser but I wanted to figure out how to do them myself, so I thought I would come up with a tutorial with the way I’ve figured out to do them.
Materials:
Long Stringy Feathers (order online or look at a fly fishing shop for a saddle)
Small crimp beads (Sally’s sells special ones that are hair colors for $14.99 or you could buy silver ones at Michaels for $2.99. It’s really your choice)
Crimp Tool or some Needle Nose Pliers
Thread
Optional:
Manic panic type hair dye (if you want to change their color)
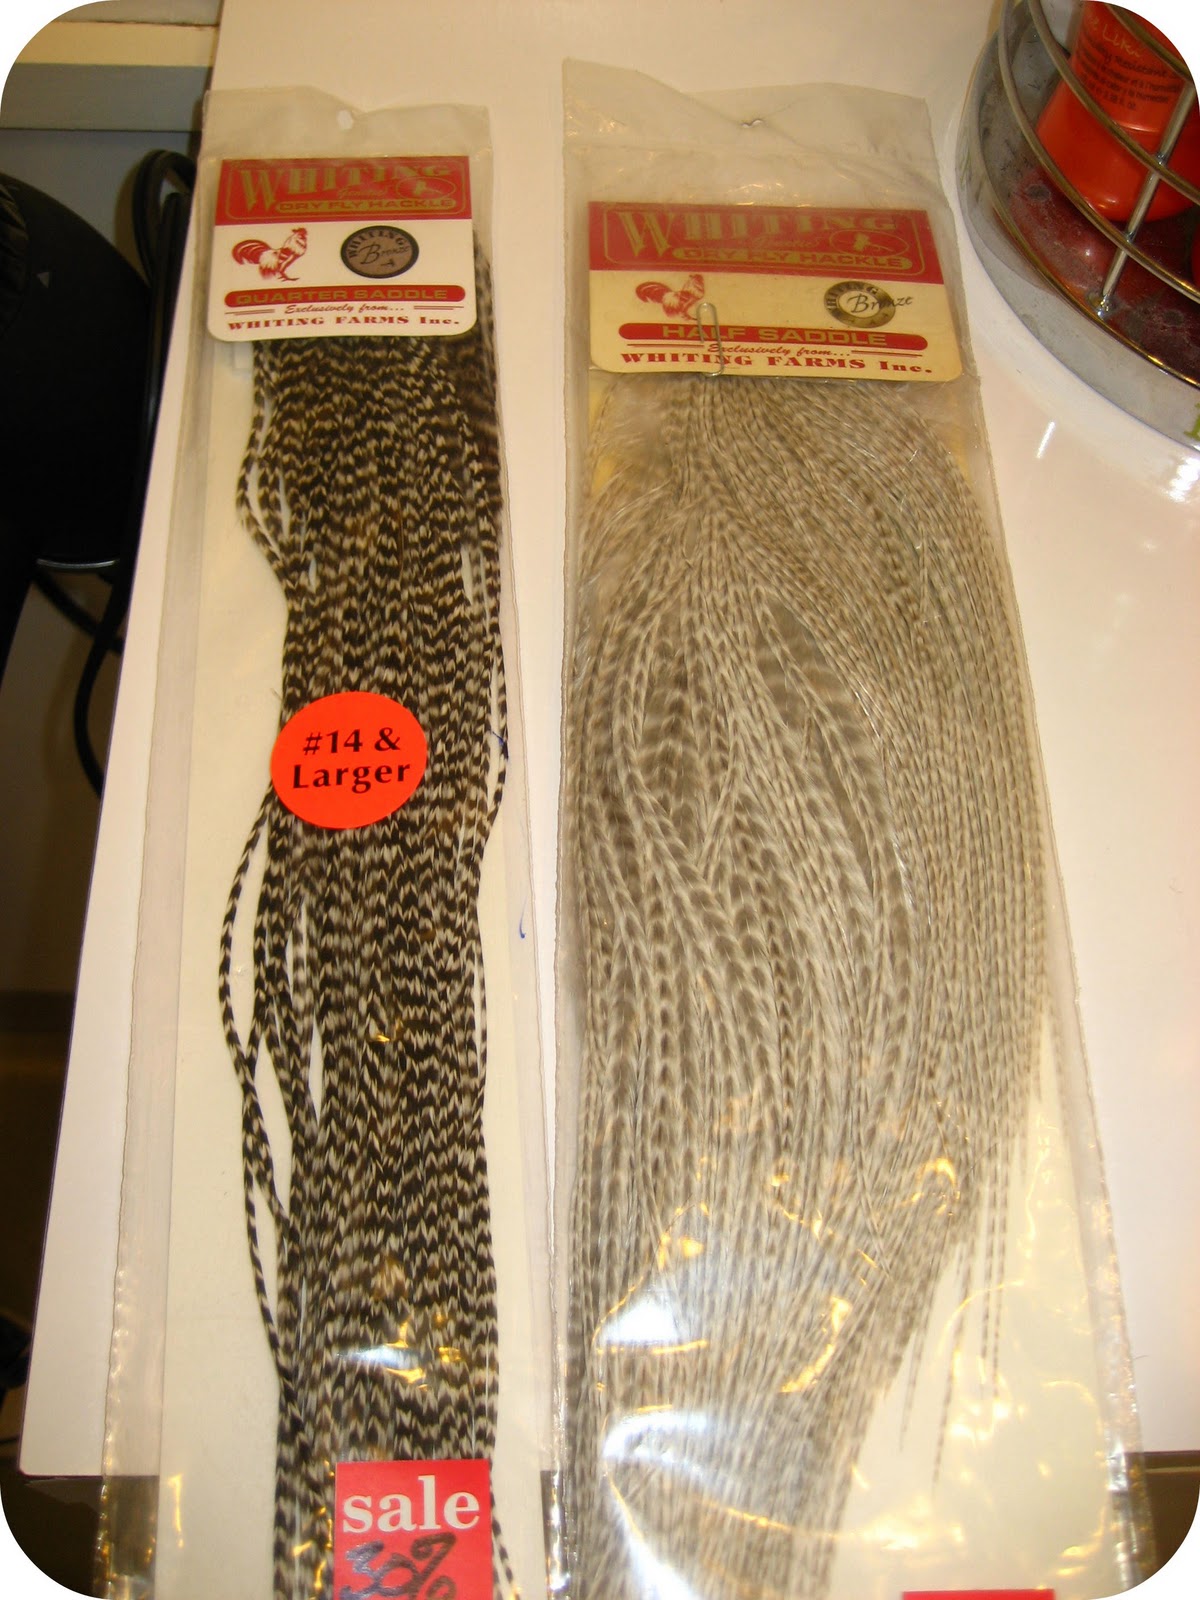

1. When you buy you saddle of feathers it will look something like this. I would recommend going in on a pack with some friends because you will probably not even use 10% of the feathers on yourself and it is the most expensive thing from the whole list.
2. Decide where you want it. You don’t want to burry it in the middle of your hair but place it close to the top or maybe by your hair line for one that shows from underneath. Then select a tiny section of hair to attach the feather to.

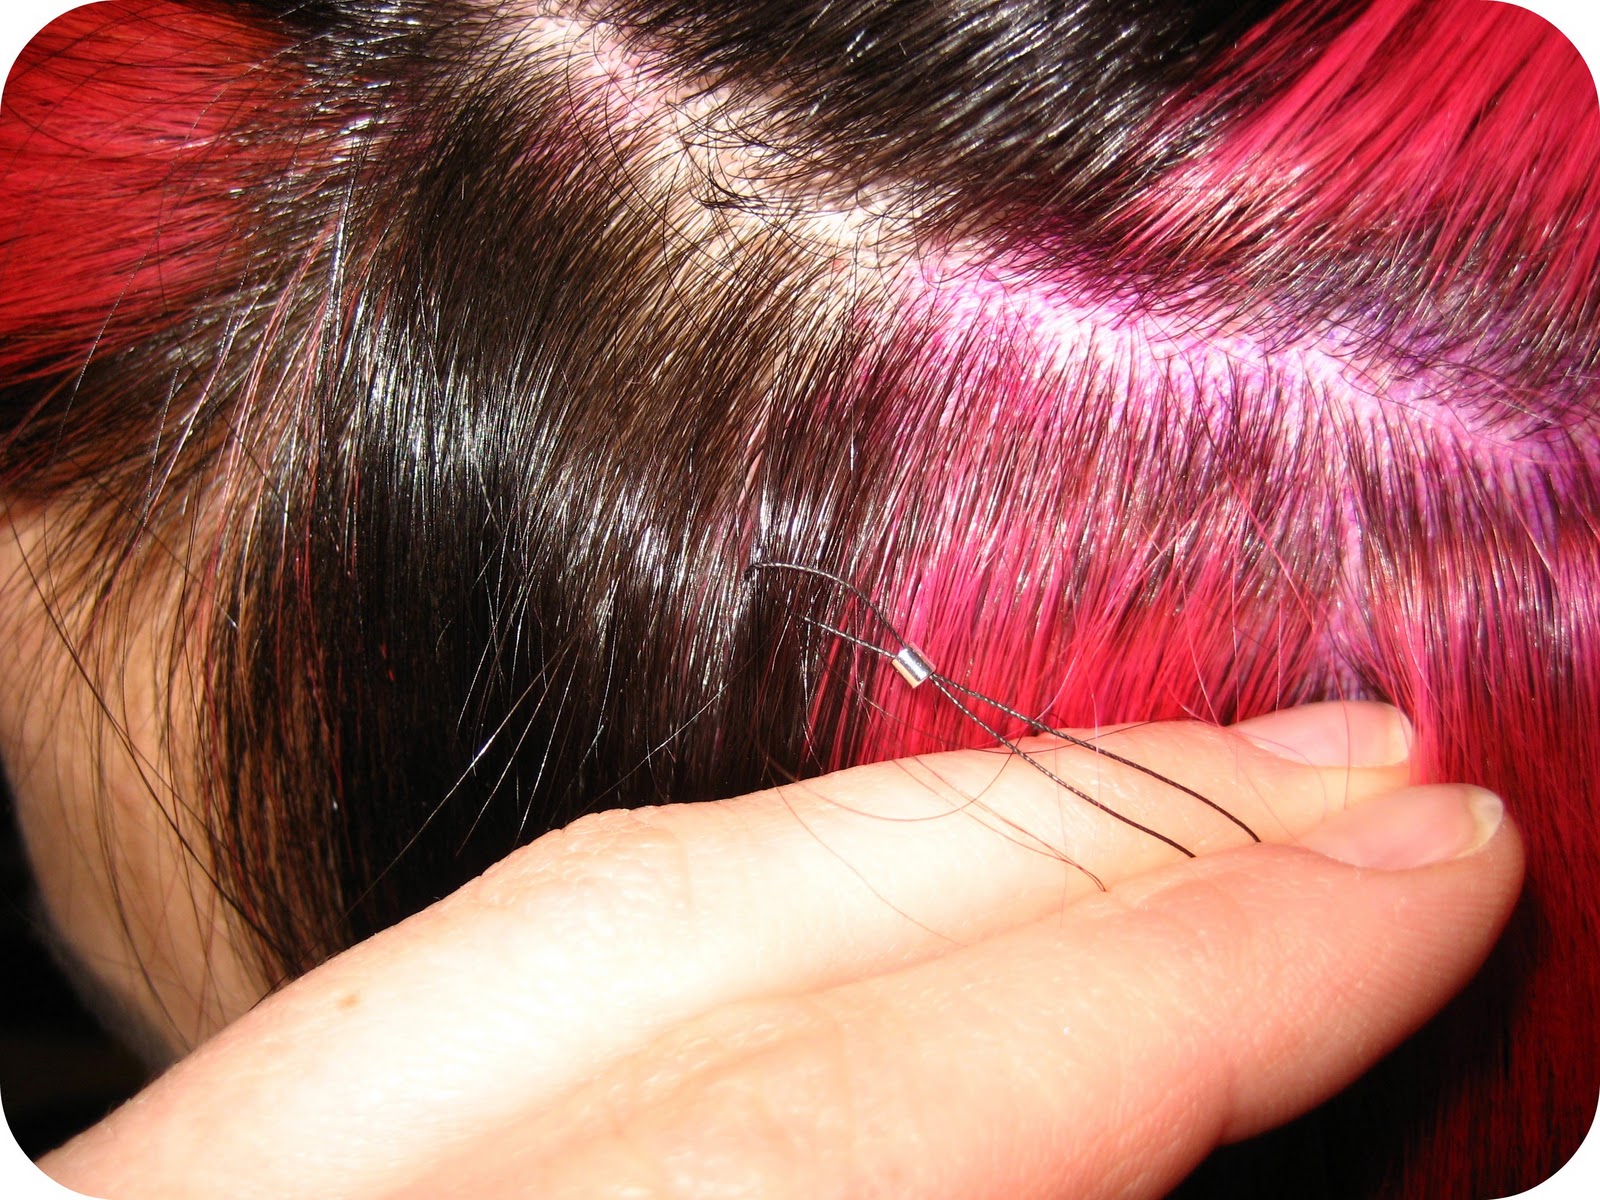

3. Load the crimp bead. Take a length of thread, fold it in half, feed the loop through the crimp bead. Then pull the strand of hair through the loop of thread and pull on the ends until your hair pops through the crimp bead. Slide the crimp bead up close to your roots.


4. Pick a feather from the saddle and pluck it out. The feather follicle thingy might be there but just pull that off with your fingers. Then slide the end of the feather into the crimp bead and squeeze it with you pliers. Maybe 2 times just to be sure it’s tight.
All done!
Has anyone else seen feather extensions and wanted some? Might you give it a try? I’d love to see what other peeps come up with.
Nothing Exciting, But So Necessary
Now that Halloween has passes it is time to work on something that is lame. This weekend I worked on some little projects that we have been putting off for a while. Back in June, Matt and I finally tiled our kitchen floor.


Previously we had what we liked to call ‘soft wood flooring’.

(surprisingly enough this is the only picture of the soft wood floors, hmm.)
It was just a really nice way to say that we laid some sheets of cardboard on top of the plywood sub floors in our kitchen. The cardboard was the unfolded packaging that our hard wood floors came in so we had plenty. The only problem was that the old threshold that went under our door from the kitchen to the back yard, to garage area did not fit anymore. Oh well. Whats wrong with having a 1 1/2″ gap under your door? Well the answer is not a whole lot if it is a nice, dry summer day. But now that winter if finally getting here, a threshold would be helpful to keep the cold and snow out of our kitchen. So one broken tile bit later we have a threshold. Yay!

You can also see one of the other projects that I was working on in this picture. Base boards. We have been without not only in the kitchen but the entire first level of our home. Luckily my dad has plenty in his basement so it is only costing my paint and sanity. Unluckily my dads house is about an hour away and I drive a 2 door VW. So everything that I have put up so far could be pre-cut and fit into my car. But now I have the 2 longest walls to complete. Anyway here is a little preview of the baseboards.

We’ll caulk the top and nail holes once it’s all nailed in but for now it is a drastic improvement.
And one more thing just for fun. I found two of these cute frames in the clearance section at Target last week for $2.50 each.

But magenta is not really a color that is in the color scheme that I invision. So I took the left over yellow spray paint that we used for some of Matt’s costume and painted them. Well I really have only painted one so far but it looks like this.

Which I think looks much better. Anyway back to work. Next week: filling in the last stupid pieces of hardwood flooring that I need to rip and cut all funny. the rest of the floor has been done for over a year now, but if I want to put the baseboards down it has to be finished. UGH. I wonder if other people put this kind of stuff off as long as I do?
Spooky Ghosts and Halloween Costumes

I was pretty excited about making Matt’s and my costumes this year. I was going as Doonise from a SNL skit, and Matt was going as The Coon.


Here we are! Anyway, they turned out pretty good if I’m going to brag about it.
In other Halloween news, we had our first Trick or Treaters in 3 years this year. I think it’s because of these spooky ghosts that I whipped up for free!
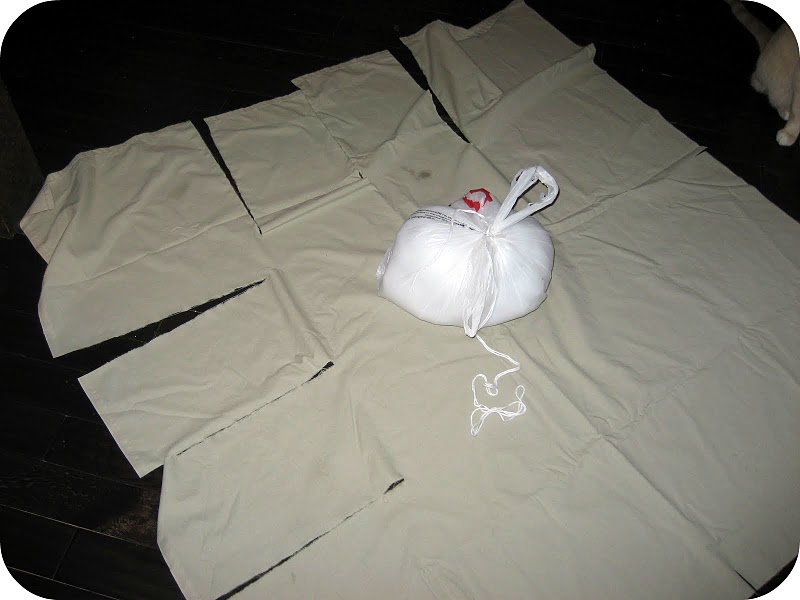
Best of all I will tell you how to make them! All you need is an old sheet, grocery bag, stuffing (or just more grocery bags) and some string.

Take an old sheet and cut it into 4 squarish pieces. With the smaller pieces fold them twice so that it would be divided into fourths and snip the corner where the folds meet to make a small hole.

Now cut little slits around the perimeter of the fabric and tear a little ways up, put the stuffing in the grocery bag and tie it closed, and then tie the string to the knot in the grocery bag.
Now just pull the string through the tiny hole in the middle of the fabric and you have a spooky (free) ghost. I also hung some glow sticks from them for a spooky glow but they are not necessary.
Enjoy.
Maybe another light fixture

Leading up the the installation of my light fixture Matt kept asking where I planned on putting it. My answer was always our bedroom. The walls are a light purple with a little grey and those cups just needed to be there. His wish was for them to be hardwired into the kitchen. While I agreed that having a nice light fixture there would be fantastic I did have my heart set in putting it in the bedroom.
Jump to today…. On my nearly weekly stroll through Anthropology, I found these lovely cups. They are a lot lighter in color than my last project. I think 5 of these would look super cute and twinkly.
DIY Pendant Light – Part III
Well here is the final installment for my DIY Pendant Light Trilogy.

I have taken 3 drinking glasses and drilled holes in the bottom and added the hardware to create a light shade


Now I need something to make it all look pretty and to hang it with. Some kind of mounting plate thing.
Purchase List:
2 1×12″ Boards cut to 12″ each: $11.16
1/4″ Threaded Rod: $0.98
1/4″ Acorn Nut: $0.60
Washer: $0.10
Toggle Bolts: $1.92
To begin, I measured the width of my board and used that to mark my length that I need to cut. While I was at that, I measured and marked what I wanted to cut out of the center, and drilled my holes where I will screw the 2 boards together.

I clamped them together and cut the excess off. I also drilled 4 holes inside of the corners of my center cut out and used a jig saw to to cut out the center.


Smooth it all out and then glue, clamp, screw, fill, and sand.


Prime, sand, paint, sand, paint, and dry. Not it’s time to put it all together. I’ve pulled the wires through the holes that I drilled for them. I chose to tie a knot in the wire to hold it but you could use those fancy staples that are made for that.

To attach the wires all together strip the ends of each wire and twist all the ribbed wires together and all the smooth wires together. screw a wire nut onto the two separate connections and secure the nut with electrical tape. And if you want you can tape anything that is standing up down like I did.


Go ahead and plug it in to make sure that it works.

Yay! It works. Now drill a hole in the ceiling big enough to pass your toggle bolt through and slip the threaded rod through the hole in the center. Put the washer and acorn nut on the end and just keep twisting until it tightens up to the ceiling.
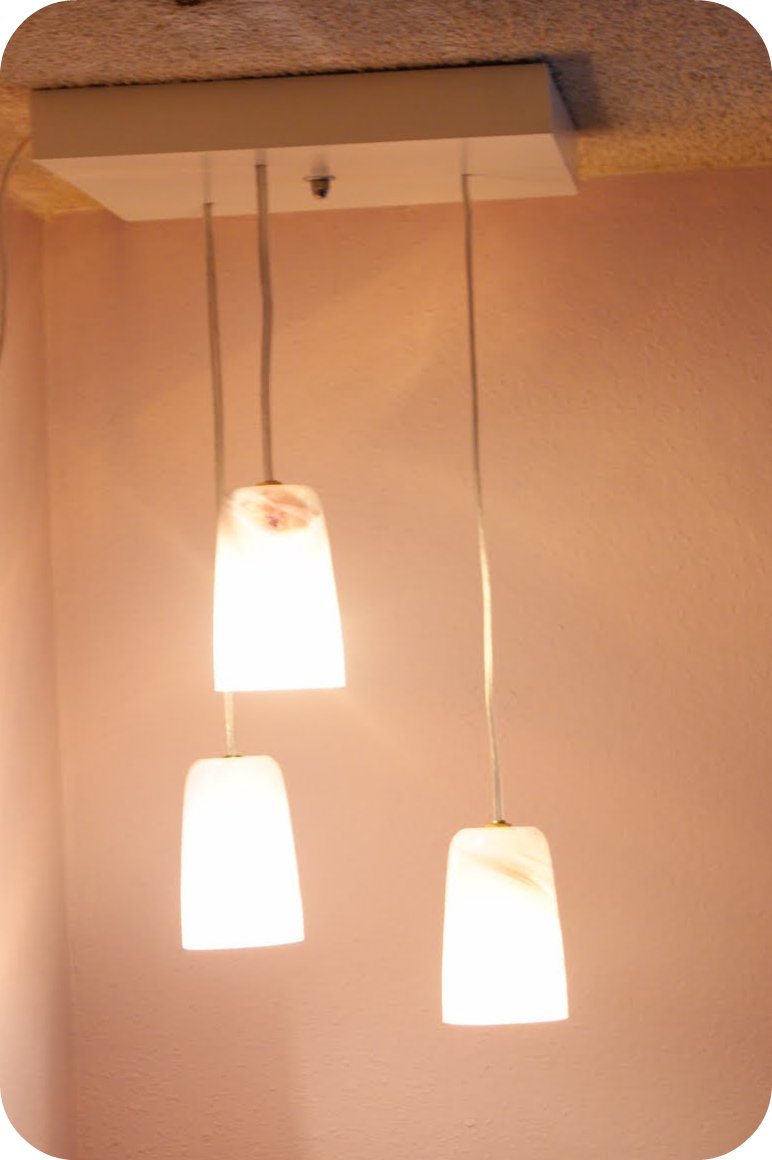
Now you’re done. Go have some wine. Smile about your fancy light that you made all by yourself (That’s what I did). Oh and Go Broncos!
Living Room Flash Back
Here is a little flash back to how our livingroom looked about 2 weeks after moving in. All the green boxes are the hard wood flooring acclimating before being installed. Believe it or not, this was actually an improvement. there was one tiny little path from the front door to the back door. Matt spent the day waiting for the Directv man to install our dish, and spent the 3 hour window putting stuff away. I was so relieved when I came home to see that we had TV and there was about 1/2 of our stuff made it out of the living room.

And here it is shortly before we began installing the hardwood flooring. I do not miss this.

